Laptop Vinyl Tutorial
Monday, March 22, 2010
I mentioned to you that my mom and I did some Cricut Vinyl cutting when she visited for these tiles I showed you here.
I was so excited to finally be able to cut vinyl that I had to do another project right off of the bat! I figured once I could cut vinyl I would be doing it 24/7. Guess that isn't entirely true but I still do enjoy being able to cut it whenever I want! I decided to cut out something fun for my hubby to have on his laptop. He is a law student, as I have mentioned before and I figured that he needed a little color pop to an otherwise boring looking laptop! He is a big fan of the Atlanta Braves so we decided to make him a fun logo. I found a picture online of their logo and saved it to my computer. **By the way, if you are going to be using Sure Cuts a Lot, you will need to make the jpeg a svg file using the free program Inkscape. Once you open the jpeg up in Inkscape, use your black arrow tool on the left to select the image. Then go to Path and click on Trace Bitmap. A window will pop up. Click on Update to see the image in the preview box. Then use the brightness cutoff threshold to adjust it if needed. I would recommend between 3 and 5 1/2. Click ok and close or move the box out of the way as it will not do so automatically. Click on the images, and move the new one out of the way. It will be a black and white image. You can delete the original. Choose the nodes tool which is below the black arrow on the left hand side. This will allow you to get rid of all of the information you do not want to cut. For example, if there was writing below a picture that you did not want to cut out. Then go to File and Save as. Save your file and be sure to delete the jpeg file ending. Make sure it is being saved as an inkscape svg. Now you will be able to import this into Sure Cuts a Lot or into Make the Cut.
 If you are using Make the Cut and are not using Inkscape to convert the jpeg into an svg file, you will want to open the jpeg file. You do this by going to File, Import and then Trace from Raster/TWAIN. (You can convert from jpeg to svg in Make the Cut but you cannot do this in Sure Cuts a Lot.)
  A dialogue box will open that will allow you to search for your jpeg file. Choose it and click Open.
 This is what the file looked like originally after Make the Cut made it into an svg file that it could work with. But we had decided we wanted to do a double layer image with red and white vinyl so we needed to work with this a little bit.
  In order to get the two layers separate, we went to Edit, Shape Magic and then Layer. It automatically split the two layers. The one above is the background image that we wanted in white.
 This is the top layer that we were going to do in red. As you can see, the program has a Cricut mat as the background so you can see what the size of your image will be. You can also view it in other colors if it is easier for your eyes.
 This image was going to be a little less than 3 1/2 inches by just less than 8 inches. So we cut the vinyl about 4" wide by 12" since that is how wide the vinyl roll is already. By the way, I used a speed of 3, pressure of 3 and blade depth of 4 on this.
 After the image was cut out, I took off the unwanted vinyl. I usually use somewhat of a diagonal direction to remove the vinyl. I think this helps to get it off easier.
 Then I cut a piece of transfer tape about 4" by 8" and carefully placed it on top of the vinyl I cut and removed the background from. I pressed firmly to ensure it was adhering to the vinyl in every spot.
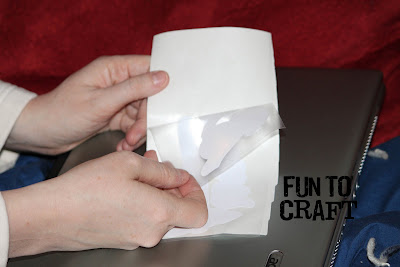
 Then I carefully removed the transfer tape from the original paper backing of the vinyl.
 The clear transfer tape allowed me to be able to see to line up the vinyl onto the laptop. I made sure to place the vinyl so that the picture would appear right side up when it was opened.
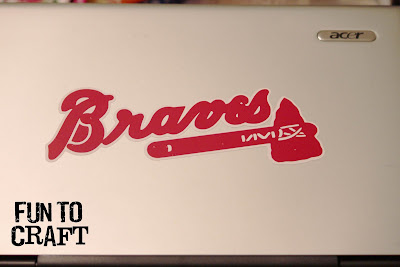
 Then I repeated these steps for the other layer of the image to be cut in red. Then I carefully lined up the red layer on top of the white layer and pressed it on. It might be helpful to use a credit card or other flat object to place this on and remove any bubbles. My Braves fan was a happy man!
**If you haven't purchased one of the software programs, I highly recommend that you do. They will save you TONS of money in the long run. You can purchase Make the Cut by clicking on the Make the Cut box on the right hand side of my blog.


6 comments:
Great tutorial. I am linking this article on Dixie Pieces.
Fun! I love that you have a tutorial too. I keep meaning to tell my friend about this awesome program. She is going to love it.
I have this program...and love, love, love it...so many things you can do with it...thanks for sharing...come on over to my blog and visit...you're always welcome.
This turned out awesome! Thanks for the great tutorial!
~Morgan
http://meetvirginiaandroo.blogspot.com/
http://www.etsy.com/shop/MeetVirginiaShop
I am so with you--I love my "Sure Cuts A Lot." Changed my life!! This is a fabulous idea!
Alison
http://oopsey-daisy.blogspot.com/
PS Your husband has great taste. I'm a Braves fan too!
This is great! I would love to make a saying for my wall.
Win Rachael Ray bake ware at my blog.
Thanks!
Post a Comment