Dresses from Shabby Apple

Blog Design

Wednesday, May 19, 2010

Most of you have noticed my new blog design that I got within the last few weeks. I usually just do all of my own design in Photoshop. I enjoy it but it does take some time. I had entered a blog design giveaway on a blog and to be honest, didn't think much more about it. I love entering giveaways but honestly, I never win anything. So when Emma contacted me about winning....I was EXCITED!!

Emma is the design guru behind Indie Chick Designs.


She has a great portfolio and great prices!! She was so fun to work with too. She sent me some rough drafts to start and then asked for more feedback to see if anything wasn't exactly how I wanted it to be. I like that because I have my own design ideas in my head and I like to be able to give feedback for something that will be representing me!

She worked on it until everything was just how I wanted it. She was able to totally change my entire layout and give me a fun fresh look. She kept the Fun to Craft 'image' similar but just made it better with color. I would highly recommend her for your blog design needs. She is fantastic!!

By the way, I am not getting paid or any reimbursement for this. I just thought I would give a shout out to a great blog designer. I think when someone does an excellent job (especially when they give something away for FREE!!) and they go above and beyond, it should be shouted out to let others know! So if you are looking for a great blog designer for a great price, go check out:


Read more...

Mother's Day Gift Idea

Originally posted at It's So Very Cheri for a blog swap. Reposting this here in case any of you missed this project, and for blog keepsake purposes!

The project I am sharing for you today was SUPER easy. Onto the tutorial....
Start with a cute plate. I got mine from Walmart for a dollar or two.
Then design your phrase in Make the Cut.
This is one of the print preview modes so you can more easily see what will print.Here is the machine doing the work for you and cutting out the vinyl.Here is a sample after it has been cut.
After it is cut out, peel off the main background and toss it.
Use your transparency tape and adhere it to the whole word strip. I only wanted to do the top word first, so I cut mine in half lengthwise so I could adhere the first word by itself.
Once the word 'together' was in place, then I lined up the second word strip and stuck it to the plate once it was positioned correctly.
Wah-lah! It is a fun saying and an easy Mother's Day gift. I know it was last Sunday and all but I couldn't spoil the surprise. So this is also a fun gift for anyone that needs a quick pick me up! Change the saying to fit whatever the occasion! You could also include a plate hanger or plate stand to display...but since I am in the middle of the move, I don't really have one out to use for pics. So you will have to visualize that one on your own!

Read more...

Hostage Week WINNERS!!!

Monday, May 17, 2010

Giveaway #1 for the Adorabelle Couture Pettiskirt Giveaway is....

Nancy who said: I love them all. But I really love the cotton candy pink!


Giveaway #2 for the $10 gift certificate to Homemade by Nicole is.....

Lori who said: i like the brown with the rose colored flower.
It would look so cute on my new granddaughter.


Giveaway #3 for the 5 winners of a pattern of your choice from Inner Hooker are....

  1. Laura who said: I love the baby sling!
  2. Nancy who said: Honestly, I love all of her patterns. I can't decide which one is my fave!!
  3. Brooke who said: I am now a "liker" of her Facebook page
  4. Mike and Jess who said: I love the cocoon pod!
  5. Red Petal who said: I love the cocoon pod crochet pattern. SO SWEET!

Congratulations to everyone who won! I have emailed all of you whose emails I could find. Please get back to me within 48 hours or I will have to choose another winner!

Thanks for entering and for checking out all of the fun with Hostage Week!! And thank you again to everyone who guest posted for Hostage Week. It was SO much fun to see what you came up with. I am excited to try out some new fun projects too!! Thanks for the inspiration!

Read more...

Held Hostage by Freshly Squeezed

Saturday, May 15, 2010

Hi!!! My name is Courtney and I am author over at Freshly
Squeezed. My blog consist of some tutorials, some of my own and
some that I have borrowed from other crafty blogs, and lots of
giveaways from my personal online boutique, CuppyCake Boutique, where
I make trendy boutique style children's clothing. I am
a mother to one very active toddler boy and wife to my wonderful
husband. On top of running a busy business out of my home and being a
WAHM, I am also a senior in college completing my studies in
Sociology.

I am so excited to be doing a tutorial here at Fun To Craft. Stacey is
so creative herself and I am a little bit intimidated, so I hope that
I can impress you guys only half as much as Stacey has impressed
myself and I am sure all of you too.

Let’s get started shall we!!!
Today I would like to show you how to make a crayon apron.
Materials needed:
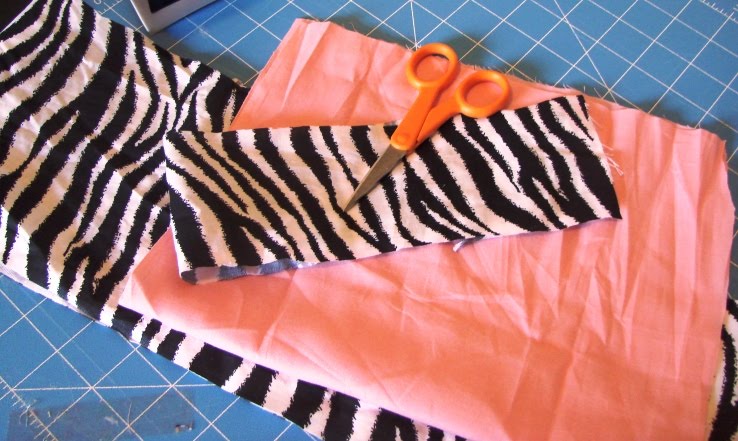
-3 pieces of fabric of your choice. I made one that will fit approx.
2-4 years old.
One piece for the apron ties (6in x 69in)
One piece for apron (10in x 16 in)
One piece for crayon holder (4 in x 11in)
-matching thread
-scissors
-iron


Now that we have our supplies gathered we can start on the fun stuff.

Take your long piece that you have for your apron ties and fold in
half with right sides facing.
Find the middle of your apron ties and mark with a pin or
marker. Now mark 5 ½ inches on each side of the middle mark. This
space will be where you will fit the apron later. Sorry I don't have a
pic of this.
Now sew the apron ties shut leaving an opening where you have marked
with your pins or marker.


Take your apron ties and turn it right side out.


Press with an iron being sure that the middle folds in as you iron.
Place the apron ties aside for later.


Now take your apron and fold the two shorts sides and one of the long
sides and fold about ¼ in. and press. Fold once more and press again.


Sew all three sides leaving one side untouched.


This part is magic to me. I don’t see many people do this so I don’t
know if it is an unknown in the sewing world but check this out. Set
your machine tension as high as it will go and your stitch length as
well.

Take your apron and sew straight down the raw edge. This should gather
your apron. If it does not then you will need to set tension to about
1-2 and sew the raw edge without backstitching. Now tug on your thread
to make the apron about 11inches in length.


Take you apron and insert it into the apron ties (remember the middle
that we left untouched earlier).


Be sure to pin, pin, pin!


Once you have your apron pinned well into your apron ties, topstitch
the apron into the apron ties.


And look you have a super cute apron as it is. But who wants to stop
there. Now we add the crayon holder.


Take your crayon holder and turn the 2 shorts sides under about ¼ in
and press. Turn once more and press again. Do the same with one of the
long sides.


Sew the 3 sides hems leaving one raw edge.


Now take your crayon holder and place it on top of the apron with the
right sides facing and the raw edge about 3 inches from the bottom.
Sew a straight stitch across the top.


Now fold the croyon holder up so that the wrong side of the crayon
holder is facing the right side of the apron. Top stitch the 2 short
sides.


LAST STEP!!!
I used the large crayons for this apron so my crayon compartments are
sewn every one inch. Use a pin to measure every one inch and sew from
the top to bottom making sure to keep your line straight.


DONE!!!!!


There are obviously more compartments than six but I only had six crayons.


How super cute is that and easy peasy. I love it. Now I have to find a
little girl to give it to. Wait a minute….do I hear a giveaway coming
on? Check out my blog to see. Also be sure to check out my facebook page to
keep up with other promotions and giveaways.


Thank you again to Courtney from Freshly Squeezed for taking Fun to Craft hostage today. What a darling crayon apron. I love that stripe animal print. SO cute!! Go check out her blog. She has some darling ideas on it...and it sounds like maybe a giveaway too!

Don't forget to enter the Adorabelle Couture Pettiskirt Giveaway here, the $10 gift card to Homemade by Nicole here, and the Crochet Patterns Giveaway by Inner Hooker here. You have until midnight Sunday, May 16th. Winners will be announced Monday!

Read more...

Held Hostage by Its So Very Cheri

Friday, May 14, 2010

Hello, My name is Cheri


from


Its So Very Cheri


I am Mom to 4 great kiddos


and


wife to one hubby.


I home school the 2 oldest boys but nexct year I will be home schooling three when G3 enters Kindergarden.


Our 4 kiddos call themselves the G-Force


--all of their names begin with the letter G--


plus my hubby is in school so life is crazy.


~~~~~~~~~~


I really enjoy blogging and just moved my blog a couple of months ago.


If you used to follow me you need to re-sign up, Google swipes all of your followers when you leave.


My blog just turned 1 year last year.


I have a couple of fun give-a-ways going on right now.


1 is an i-phone and


the other is


a really cool Craigslist APP.


~~~~~


I have a couple of fun parties each week.


On Mondays


Its So Very Creative


and on Wednesdays


SPOTLIGHT YOURSELF


~~


I am also part of the DIY Club.


We just had our first event.


We will be changing several things next month to make it even better.


This Sunday we will announce the top 10 and the voting will begin.


Come over and vote for your favs.


Enough about me and my blog.


I am so honored to be here today to share with you a fun tutorial.


I have some pretty Beach Glass.


I picked up some pretty aqua, green and blue rocks while we were at Sea World


to mix in with the sea glass.


No it was not a thrifty buy but I crammed as many rocks in the bag as I could possibly fit.


I just think it is so pretty.


~~~~~


Maybe you have seen the pretty
SEA GLASS
in the Flea Market Style Magazine


Or
in a pretty piece of jewelry.


Do you know what it is?


Beach Glass is also called
Sea Glass


It washes up on the BEACH
BUT
it is hard to find
You usually have to get up
really early
to find it
before
they sweep the beaches clean.


Some people think it is something
created by the Sea
but
NO


It is actually
something beautiful
that comes from humans leaving trash


People go to the beach
with their thick beer bottles


made of nice thick glass


that comes in a variety of colors


and they leave them there.


They get washed back into the water


God allows
the Sea
to begin doing its magic


When they wash back on shore
we get beautiful


Beach Glass


If you don't live anywhere near a beach


You can make your own beach glass


that looks pretty close to the real thing.


You will need:


An Ice Cream Maker or Rock Tumbler


Gritty sand


Rock Salt


Thick pieces of broken glass in a variety of colors


Water


Directions:


You want to take broken glass pieces


Make sure you use thick glass


Get an ice cream maker


(if you don't have a rock tumbler)


Take out the paddle arm.


Put your pieces of glass in.


add some gritty sand --a few Tablespoons


I think it needs some rock salt as well


After all the ocean has salt and I am sure it plays a part


in creating these beautiful pieces


Just barely cover it with water.


Place in your garage and tumble away for 1-4 days


depending on the way you want yours to look.


Thanks for the fun day at your blog.


I look forward to a long fun friendship.


Cheri


Come for a visit and follow along and I try to come by and follow everyone that follows me.


Thanks again to Cheri for being part of Hostage Week. I am also bloggin' over at her place so go check it out. I am loving this idea of making your own beach glass. Very pretty!!


Hostage Week is great, minus my big FAT packing mess that I am dealing with at my house!! Don't forget to enter the Adorabelle Couture Pettiskirt Giveaway here, the $10 gift card to Homemade by Nicole here, and the Crochet Patterns Giveaway by Inner Hooker here. They all end at midnight on Sunday. Don't miss the chance to win!!

Read more...

Look at Me!! Party

Thursday, May 13, 2010

Welcome to the PaRtY!!!


Link up any creative post and link up to the post (NOT your main blog URL). Snag a button and get the word out about 'Look at me, I'm so Crafty!' at Fun to Craft by putting it in your post or on the side of your blog. That way people know where you are partying!

Just for fun, why don't you visit the blog linked up before yours and comment. That way everyone is shown some love and it may even introduce you to some new blogs. You can always check out any other ideas too!! Thanks for linking up! I can't wait to see what inspiration is out there! I apologize in advance if I don't make it around to everyone's blogs to comment. I will be checking out each idea but it literally takes me hours and hours to comment. So I may not be able to comment on everyone's with my crazy moving week, my hubby's graduation, and our 1500+ mile trip. I am sorry but I am SO looking forward to your inspiring ideas!

Also, hope you are enjoying Hostage Week as much as I am!! Don't forget to enter the Adorabelle Couture Pettiskirt Giveaway here, the $10 gift card to Homemade by Nicole here, and the Crochet Patterns Giveaway by Inner Hooker here.


Read more...

Held Hostage by Our Daily Chocolate

Hello Fun to Craft readers! This is Ashley from Our Daily Chocolate, and I am so thrilled to be here guest posting while all of Stacey's craft items are being held hostage. I just went through a move 2 months ago and can completely relate. It's no fun. But I hope to help make it fun here at Fun To Craft. I am going to share a little craft tutorial I did this week that truly was FUN! I hope you all enjoy. And thanks Stacey for letting me help out here while you carefully guard those craft boxes.

I never seem to have a problem crafting and creating something girly. Girly things are just easier. But this week my son needed something. An actual NEED, not just something cute. But how can I make something and not make it look cuter? How can I make something cute without making it too girly?

That was my battle this week. And of course I was under pressure! I had to come up with something useful, stylish, not girly, but awesome, all to share with you fine folks!
Every week my son has a bible verse he has to memorize for his Sunday school class. I wanted him to have someplace he could display it and see it every day.

So here is what I came up with. And. I'm even gonna show you how to make it!

A burlap covered bulletin board!

I heart me some burlap. And I figured, burlap isn't just for girls! No way! I can use it to make something boyish. Yes, Boy-ish.


I found this bulletin board at GW for $1. Perfect! I already had some burlap and upholstery tacks. So away I went, sticking and pinning and stretching and gluing. After 15 minutes I had created a super cool, stylish, and inexpensive ($1) USEFUL craft item for my son.

Want to make one? It's so difficult! {*wink*wink*}

You'll need:
  • Bulletin Board

  • Burlap

  • Upholstery Tacks

  • Glue Gun

  • 15 minutes

  • Large piece of chocolate (or other type of sweety)

First you want to cover your board with burlap. Make sure no creases are in the middle of your board. That's not very pretty. Then use 4 tacks, one for each corner.


Once you've pushed those 4 tack in, reward yourself. You're working so hard to make this useful item, you deserve a bite of chocolate. Go ahead. I'll wait!

Now that you are recovered from the exertion of those 4 tacks, you'll want to start filling in the border with more. {I just eyeballed my spacing, you can't tell ;}.


Next, take a larger bite of chocolate. The placement of those tacks was much more exerting. Enjoy that chocolate. I'll be here when you're done.

You're back! Great! Now you want to cut the burlap leaving enough to wrap around and glue to the back.


I would use low heat if i were you. If you've never done a burlap project, take heed. Hot glue is very hot and yes, you will be burned, and yes your fingers will be covered in burlap. If you burn yourself while gluing, you have full permission to eat the rest of your chocolate straight away!

Once the gluing process has been complete and you have sufficiently burned off all fingerprints, turn over and admire!


{See, mine is boy-ish. My upholstery tacks are flowers and the only pushpins I have are big diamond-looking ones}.

He can keep his bible verse tacked up there, or his library receipts with the DUE DATES {so he can avoid a $2.40 fine that has to come out of his piggy bank}. Or other fun info like his schools* festival coming up.

The possibilities are endless. I had to restrain myself from adding burlap flowers to the corner and adorning it with ribbon. {I think I see another, more girly one, in my near future}.

Thanks to Ashley from Our Daily Chocolate for holding Fun to Craft hostage. I really liked her cute burlap bulletin board. Oh, so manly, or boyish. haha I am definitely seeing the cute factor with a few more girly touches too! I think I love both options. I am also a huge fan of having some chocolate in between steps!! That is a necessity when crafting. Go check out her blog and see all of her other cute projects.

Don't forget to enter all the giveaways here this week too!!

Read more...
Related Posts with Thumbnails